Adding a citation to an image
In honor of St. Patrick’s Day, and because The Legal Genealogist wants to show off a favorite program, today’s post is a how-to rather than a why-to.
Reader Margel Walker Soderberg carefully read through the post last week about source citation and why we as genealogists should spend the time it takes to craft a good solid source citation.1 Then she raised a question a lot of people have:
I want to cite my sources correctly and I have tried but . . . Here is one issue I’ve had. Recently I was searching newspapers on the Chronicling America site when I found an article. I cut it out and saved it to the folder on my computer for that person. Even though the citation was listed as the top of the screen for my snip, it doesn’t show when I saved the file. Many of the online documents that I save are in jpeg format so how/where do I put the citation when I save them.2
She added that she’d tried inserting the image into a word processing file, but that didn’t help her find it later. She uses a thumbnail view to quickly scan the images, and all of the word processing documents show up with the same program logo instead of the image.
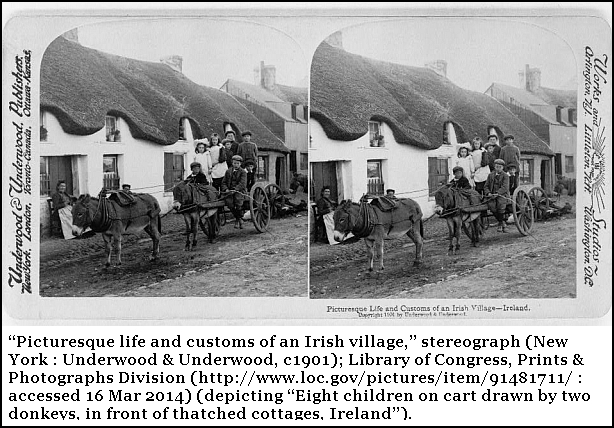
So… in honor of St. Patrick’s Day, the image we’re going to use for this little demonstration is this one:

It’s an image of a stereograph produced about 1901 of “Picturesque life and customs of an Irish village” and depicting “Eight children on cart drawn by two donkeys, in front of thatched cottages, Ireland.”3
But you don’t see any of that information on the image. How do we get it there to stay?
Enter the favorite program. It’s called Irfanview, it’s a photo viewing and editing program, it’s simple to use — and it’s free. (And yes, before you ask, it’s Windows only. But the steps will be basically the same in any basic Mac photo editor too — and, for that matter in any other Windows photo editor.)
And here’s how you use it to put your citation right on the image.
You take the image above and open it in Irfanview. It’ll look like this.
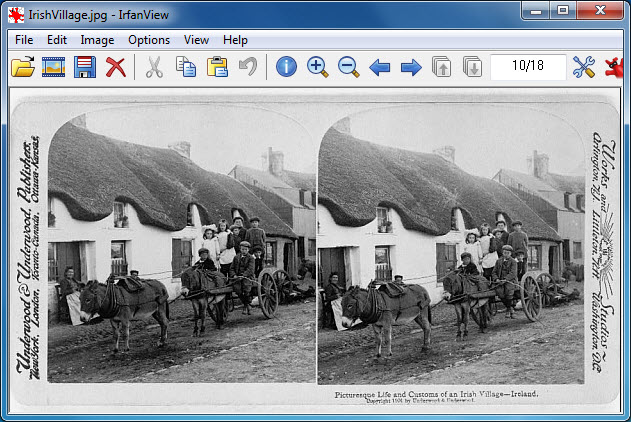
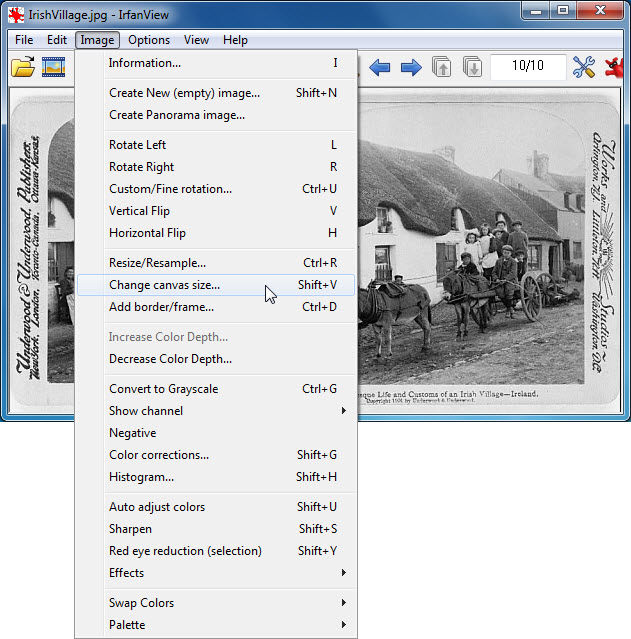
Drop down the Image menu and choose Change canvas size, here:
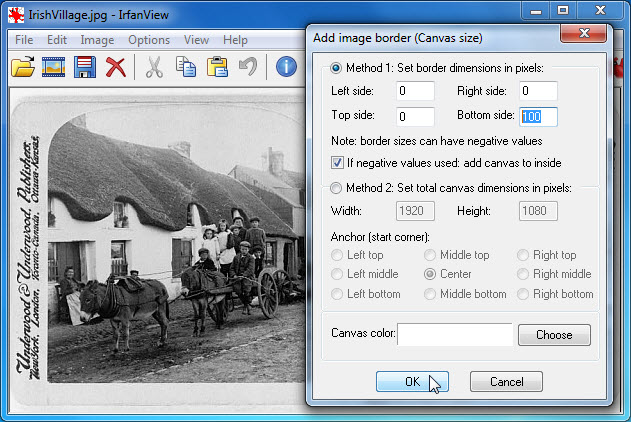
In the box that appears, add more space, measured in pixels wherever you want it — top, left side, right side. or bottom. Here, I’m adding 100 pixels of space at the bottom in a white canvas color:
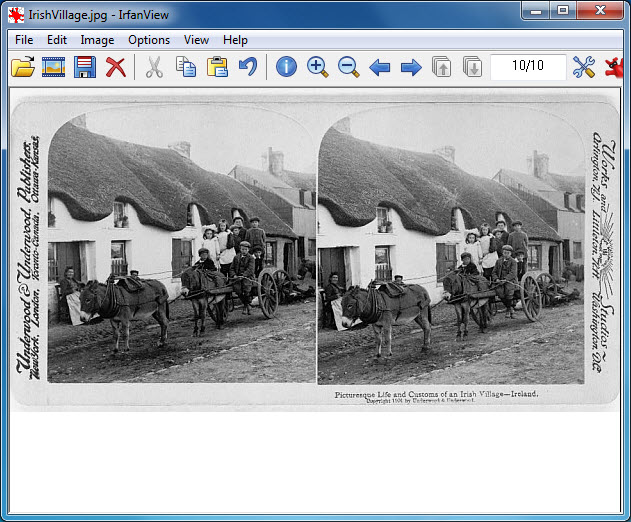
Once I click OK, the image will look like this:
Use your mouse and select the area of that newly-added space where you want to add the text:
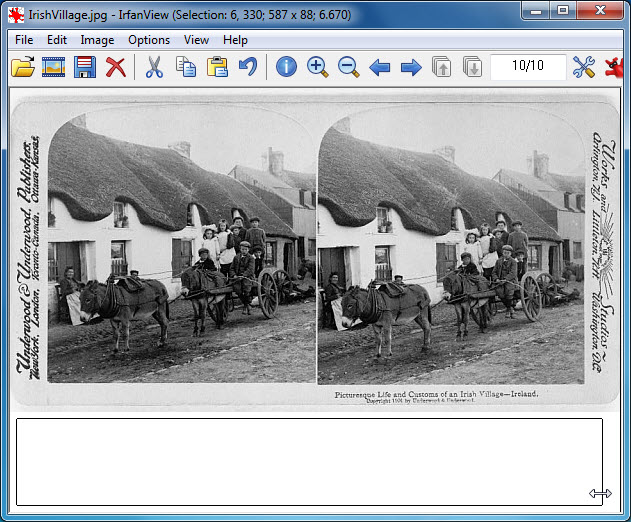
Drop down the Edit menu and choose Insert text into selection:
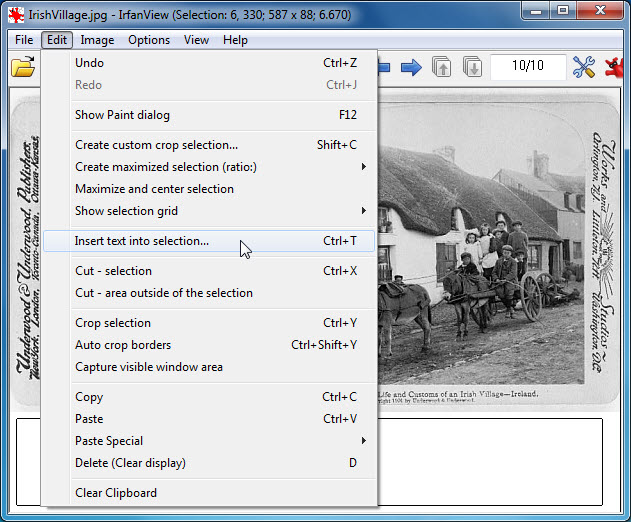
Choose your text options — I chose 12 point Georgia font in black — and paste your ready-to-go citation into the center box:
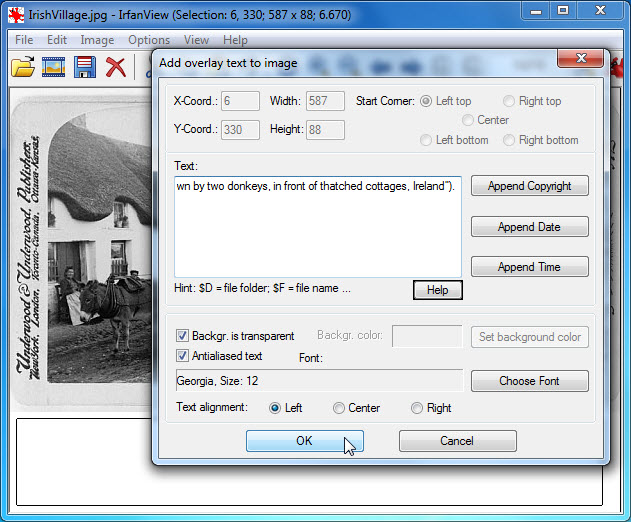
It’ll look like this when you click Ok…
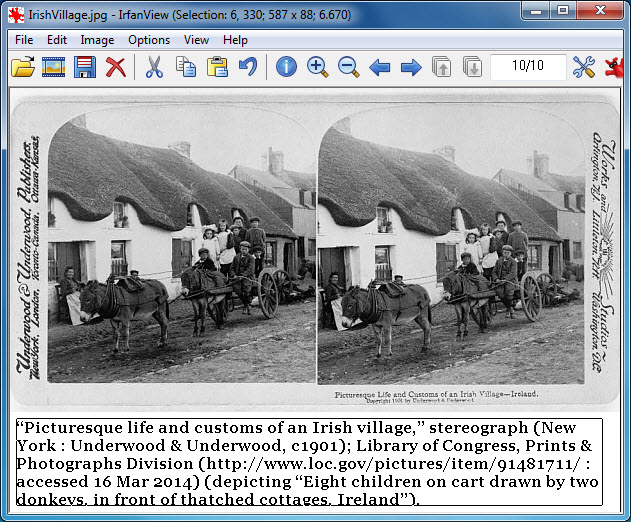
… and like this (I added the border to make it stand out) when you save the file.
All done — and you will never again have to worry about a citation not being with the image you just saved.
SOURCES
- Judy G. Russell, “A citation sigh,” The Legal Genealogist, posted 13 Mar 2014 (https://www.legalgenealogist.com/blog : accessed 16 Mar 2014). ↩
- Margel Walker Soderberg, comment to “A citation sigh,” posted 16 Mar 2014. ↩
- Image description, “Picturesque life and customs of an Irish village,” stereograph (New York : Underwood & Underwood, c1901); Library of Congress, Prints & Photographs Division (http://www.loc.gov/pictures/ : accessed 16 Mar 2014). ↩


I have had this issue for years! I went into my photo editing program and found this capability also. Thanks so much for this tutorial.
Glad to help, Karla — it’s easy ONCE somebody explains it! Figuring it out on your own, not so easy at all!
I’ve struggled with this issue for a long time. For me, the easiest way to attach sources is by using one of the screenshot programs such as Snagit or Skitch to add text to an image (both programs are great, although Skitch has the edge because it is free). If you are taking a screenshot of an article, you just add a text box and cut and paste your citation — simple and takes about two seconds. If you are downloading a file, it is still easy to open the file on your computer and add the text.
Kathleen, I absolutely adore SnagIt and couldn’t live without it — but it’s not free. That’s why I used Irfanview for the tutorial. (I’ll have to look at Skitch.) But again — it doesn’t matter what program gets used, the principles are the same across the board.
Wished I had known about this a month ago when I was doing my ProGen assignment. Then all of my images would have had their citation attached to them!
Ahem… you will go back and add them now, won’t you? 🙂
Yes, I will. And I even figured out how to do it in Photoshop Elements.
Good for you!! (On both counts!)
Thank you so much for this tutorial and the name of this free program. I learn from you all the time! There is just one thing I always wonder about: Why is it important to note when you accessed the file?
The biggest reason is this: what if the page you accessed disappears? Maybe the URL will change, maybe the whole website will be taken down. Showing when you saw it gives people some options, not the least of which is to try to find the page on Internet Archive’s Wayback Machine service.
Thanks so much for this fine article. Just downloaded the basic program AND the add-ons. Look forward to playing with it when I get the chance to install it. Now I guess I will have to go back and add citations to my downloads like Lisa. BTW, from a fellow alum, GO RU!
Glad to help, Chuck. (And love your email address…)
You talked me right into this, Judy. And the price is perfect 🙂
I suspect Irfanview will experience an upsurge in downloads from this. I seem to remember a friend talking me into trying this out a few years ago, and on a different computer. Don’t think I used it much – I hadn’t done any scanning of photos back then. Clearly I forgot about it when my computer crashed several times in a row and I upgraded with my limited backup files at that time. Thanks! Good reminder.
Always glad to help, Celia — and always glad to introduce (or reintroduce) people to one of my favorite programs.
Thanks for sharing. I use irfanview all the time to crop my images and to add text. But I did not know about this add white space option and about how to add text to a selection. Usually I have to go back into paint to create more white space, then back into irfanview to add text. I’ve learned two new things that will help a lot!
All kinds of goodies that Irfanview has tucked away in its toolbox, Ginger. Glad I was able to explain some new ones for you!
Ok, I lied. I haven’t been using Irfanview. I’ve been using XnView which is similar, but does not seem to have this same ability to add white space. It can, however, add text with white space behind it, which is what I use! Anyways, I will add this one to my toolbox as well!
Ginger, check and see if you don’t have an option for Image > Canvas Size. I think that’s also in XnView, no?
Thank you for the wonderful tip! I have a Mac but I’m going to see what I can do with iPhoto!
So glad you found it useful, Heidi! And I’ll be most surprised if iPhoto doesn’t have the same capabilities.
Brilliant! And why haven’t the rest of us figured this out sooner? 🙂
Just didn’t think of it sooner, that’s all. Glad it helps.
Irfanview ia a great program! But there’s an easier way to add your citation. On a PC, right click on the file and then click on Properties. You can put your citation in the “Comments” field. On a Mac, click on the file and then type Command-I (for info). The comments field is at the top.
The comments field under properties doesn’t exist in Windows 7.
To find the “Comments” field in Windows 7, right-click on the file name, open Properties, click on the Details tab, then you can insert text into Title, Subject, Tags, Comments, Authors, Dates, Copyright, and some other fields.
If the Comments or other desired fields are not showing as columns in the Windows Explorer detailed view, simply right-click on any column header, and tick the Comments and any other columns you’d like displayed. You can then drag columns left or right into the desired order. As already mentioned, the hard part is remembering that the metadata is there, and that some sites may strip it on upload 🙂
Aha! I looked there and it doesn’t LOOK like that field is editable, but if you click on it, you DO get a box you can enter data in. Thank you!
Love this idea. How does this affect the photo if you want to print it?
It doesn’t affect the image at all. The footprint (total size) is a little bigger, so if you started with a 5×7, it may now be 5×8. But unless you resize the image part (not the canvas part) it doesn’t affect image quality one bit.
If it is resaving the image in a lossy format like JPEG then there will be SOME loss in image quality, but for many (most?) purposes it will not be appreciable. The danger with such things is repeated edits & saves, and that can degrade an image in lossy format due to compression dropping similar (but not identical) neighboring bits over and over. But if you limit yourself to a single “save as” and give it a new name (you would do that anyway, right?) you should be fine.
If you reasonably expect an image to need repeated modifications & saves then consider transferring it to lossless format like TIFF as early as possible, and do all the edits there. You can easily export it as jpeg for sharing/posting purposes as needed. TIFF takes a lot more space than JPEG (even if you set options for minimal compression of jpeg), so perhaps you use this for more important images and of course those that will be repeatedly modified for whatever reason.
Some examples are shown and discussed here: http://www.prophotoshow.net/2008/03/25/file-format-degradation-saving-destructive-edits-compared/
Good point — thanks for adding it.
Very interesting, thanks! I do like IrfanView, though for Mac OS I had to find another, and use GraphicCoverter (shareware, I don’t have a free recommendation offhand). It reminds me of a family photo project in which I’ve been scanning photos from the family albums my parents built up over the years (scanning back to if there’s anything on them). I’ve been using similar technique, expanding the canvas, but I was using the space at the bottom to include the back annotations (along with typed out text where the handwriting was hard to read). I entered all the metadata re caption/title/photographer/subjects/where/when into the standard metadata fields, including copyright statement, and those don’t show in the image itself, although they are fully searchable via the OS, shown in Get Info / Properties view and so on. Do you think that is sufficient for this type of project, or should additional metadata be embedded into an extended canvas area too?
I have two fundamental problems with metadata, Dave (folks lurking: metadata is information that describes the data you see, and in images it’s recorded right in the image code but in a non-visible way unless you use a program to show it to you). The first is the very nature of metadata: it’s not visible at the moment the file is opened. Because of that, I’d be willing to say the vast majority of people have never seen metadata associated with an image. How is Aunt Gracie supposed to know there’s metadata with the citation information? The second is that there are programs and online sites that automatically strip the metadata. Upload to site A, and all the metadata you so carefully entered into that image is gone. So I tend to think relying just on metadata isn’t enough.
You echo some of my own concerns, so thank you for noting them clearly. I’m still wrestling with where to draw the line between what should be in the image (as above), what should be in the metadata fields (where they really should be, even if they are in the image too, at least for those looking forward to future users and software that are more savvy to metadata), and what should be in both places.
For the purposes of a project to scan our own family photos, where we expect some use to reproduce albums and some use for various other purposes we may not even know now, I suppose that some source/contact info might be included in the image, but then contact info goes stale anyway… Hmm…
Well, thank you for forcing me to ruminate over this more, I do need to continue this process…..
Oh, and I agree that sites stripping metadata from uploads is a chronic and under appreciated problem… I recall a blog post about it, but don’t have access to it. At the time I think Facebook stripped most/all, Flickr stripped out some, but dropbox left it all untouched. That’s all I recall about it though.
I’m with Dave on wanting the data embedded in the file in computer readable form. Sadly current image file formats don’t included protected metadata that cannot be removed. Image metadata standards exist, but like genealogy data standards, are not universally applied.
Metadata are often stripped by software ‘preparing’ the image for the web, which tries to minimise the file size. That drives me crazy because images I post online are the ones I most want to have thier data attached.
I like the option of showing the citation, but am not keen on keeping the same data in two places, as that is a recipe for future inconsistency.
Judy, your method alters the image, not just the file. So, you have in effect created a new edition of the original image. If you edited an image file by adding a citation, you could also have made other alterations (though of course you never would ;-)). How would you document the process and the provenance of the image?
I don’t consider it altering the image to add a border around the image any more than I would consider it altering the image to print one on 5×7 paper and another of the same size on 8×11 paper. Because the data I’m adding in that border is the citation to my copy of the image itself, that (to me) is enough to document the provenance.
Thanks for another method. I had just written a post a couple of weeks ago on this very issue. I use Jing and made a little screencast here. http://librarycurrants.blogspot.com.au/2014/02/adding-citations-to-images.html
Nice to have confirmation that most programs make this easy!
Thanks for the tutorial! I’ve had Irfanview on my computers for ages, but hadn’t a clue about how to do this – I used it for other things. I can see all kinds of other ways it will come in handy other than just for citing sources.
Glad you found the post useful, Dan!
Oh wow, how did I miss this post? I have been busy with work and family so imagine my surprise when I found that you created a whole post about my comment. Thank you so much. It is especially nice to see the program you recommended AND to know that others had the same issue I did.
Great question with LOTS of people who needed the answer, Margel. Thanks for asking it!
It’s probably obvious but perhaps worth mentioning anyway. I have used this same method to identify the who, where, and when while digitizing old family photos. Have to admit that using it for citations never occurred to me. Thanks for sharing.
Always glad to suggest another use for things.
Thanks, I love irfanview, but hadn’t thought up that twist. I do use irfan to put the citation in the comments and IPTC info though, but it only works for jpgs. So all my images that are not jpgs get converted. Your method will work with any format, and is immediately visible without hitting the metadata,
Glad you found the hint useful, Nancy! The big advantage is that anyone who sees the image immediately knows where it came from — no matter what happens to the metadata and no matter if the person even knows there’s such a thing as metadata.
Thanks for this great tip Judy!
I want to let you know that two of your blog posts are listed in today’s Fab Finds post at http://janasgenealogyandfamilyhistory.blogspot.com/2014/03/follow-friday-fab-finds-for-march-21.html
Have a wonderful weekend!
Thanks very much, Jana!
I tried this but couldn’t get the text at the bottom of the photo to all fit in the space. I don’t know what size the fond was but it was huge. I could see that on your photos the type was in proportion to the photo. What am I overlooking?
In the steps, when you get to the step that reads “Choose your text options — I chose 12 point Georgia font in black — and paste your ready-to-go citation into the center box,” look carefully at the image. There’s a box most of the way down, two levels above the Okay click box, that reads Choose Font. That’s where you can change the size and the font to fit the space that you have.
This method is terrific for captions; to explain the event or to name the folks in the photo. Not to put too fine a point on it; this method DOES create a new file and the new file carries the new ‘created on’ date. And I’m a big advocate of using the metadata for all the good reasons cited by others. (But then I never post on Facebook …) You will find the real big advocates of metadata among those photographers who create (tens of) thousands of photos a year; they would never locate a specific image without it.
About the accessibility of metadata; very few of us had even heard of the stuff five years ago and now we can discuss its advantages and disadvantages … I believe it will become even more common and more accessible with the passage of time. But there still will be that last person to hear about metadata; probably Aunt Hattie!
DICK FOLKERTH
Yes, it’s a new FILE, but not a new IMAGE, at least not in my way of thinking. And I would do both — add the metadata AND add the caption.
Thank you for sharing a great tool, Irfanview, and for providing a marvelous tutorial on how to add text to an image. I just labeled and cited one of my images using Irfanview following your clear directions. It’s so easy and free! Thanks.
I am a photographer as well as a family historian. For years I used another free image editor named GIMP, which I refer to as a sort of ‘poor-man’s’ photoshop. For the last half dozen year or so I have used and love Lightroom and Photoshop together. Obviously few genealogists are interested in dealing with a photoshop learning curve and its expense. While I am not about to convert from Photoshop to Irfanview, I do believe really hits the spot.
I understand that your tutorial is entitled “An image citation how-to”. And as important (essential) as it is to add appropriate (as complete as one can) source citation to photos, I believe it is at least, if not more important to add visible labeling information to all our family history related photos, of people or containing non-textual images. Who is in the photo? What is its relevance – why do we have it? If we do not know what this photo is about, who is in the photo, or its relevance to our family history, then it is most likely a totally useless photo cited or not. We all have known the disappointment of finding unlabeled family photos for which there is NO ONE who will ever be able to identify the photo. Let’s not do that to those who follow us – our kids –future generations. I am fortunate enough to have several thousand family history related photos. I have done my best to label each photo with names, b/m/d dates, location and date of photo (when known); as well as all the citation data I know. I strongly believe that labeling as well as proper citation needs to be stressed. The good news – this labeling is exactly as easy as you describe in your piece.
I will be giving a class on Harnessing the Power of Digital Photography For Family History, next month and will be sure to add http://www.irfanview.com to the list of free image editors.
Thanks again for your work,
Ron Madson
Thanks for the kind words, Ron, and glad you’re finding Irfanview worth the look.
I think this is a great way to both add a citation and caption a photo so it stays with the photo. I do use metadata regularly, both on my documents and on photos (once a pro, always a pro), and have sometimes add info in a text box on the photo itself — but had never thought of adding canvas space! This was a head-smacker for me. Now that you’ve explained it, it just seems so obvious.
I do need to point out though, Judy, that when you save a jpg you ARE creating a new image that then replaces the original. With jpg, each save results in degrading the quality- it’s how jpg is. If you open and save several times it becomes noticable, especially if you are using compression to lower the filesize.
This is what I do to avoid any more loss than necessary: I make a copy of the original to work on (identified usually with the number “1” added. There is no loss of quality in a copy- it is identical to the original. It is preferable to save it in a lossless format if your software permits. I use the copy to make any adjustments I need to make in the image, and then save that with no further changes and adding “edit” to the name as identifier. Now I can change canvas size, add the citation, etc. Finally, I’d do a “save as”, adding “citation” to the name as identifier. This minimizes any loss of quality during saves, and you still have both the original image and the edited copy to go back to.
You’re right that there is SOME image degradation in resaving a JPG. If you save at 100% you won’t be able to detect it with the naked eye.
Thanks for the tip – I’ve used irfanview for years but didn’t know that trick. I have been using the Comments field (or the metadata itself – press I) and for some things like that better as the original image is still as it was. I’m’m thinking especially of scans of actual printed family photos in my possession that I might want to use in a scrapbook, for example. I believe that the metadata is then searchable without having to use OCR and it doesn’t degrade the jpg. Unfortunately it is hidden from immediate view,
Adding both metadata and a citation is the way to go, really.
I like the “it’s free” part.
Hard to argue with that, isn’t it? 🙂
Thank you, thank you, thank you! I couldn’t figure out how to do this even though I’ve heard people talking about it. I searched and found your article. Thanks again!
In IrfanView you can skip one of the steps. Select Insert Text. Type whatever you want into that box, ignoring things like justification. Select Insert and IrfanView will make enough space for whatever you wanted to insert. No need to Change Canvas Size.
The point of changing the canvas size is to create white space so that the text you’re adding doesn’t overlap the image.